Showing posts with label being frugal. Show all posts

Tuesday, August 27, 2013

peppermint toothpaste


Cleansing, protective, healing.

This toothpaste is fabulous. 
It is so easy to make, tastes good and is really good for teeth!

I have been researching for a while, alternatives to conventional supermarket toothpastes for a couple of reasons.
My kids are not good at spitting toothpaste and will often eat the tube toothpaste.  This concerns me because of all the potentially harmful chemicals in conventional toothpaste.  Even when used as recommended, the bad stuff has to be taken up into the body.  And I don't want that.
We also have a tendancy to waste so much toothpaste around the sink, sqirted into the tub, spread over the bath toys...!!!  I have very creative and curious kids!  When I can make the same quantity of toothpaste for a fraction of the price of a supermarket tube, if some gets wasted, I don't mind so much.

There is a better, healthier and cheaper alternative to supermarket toothpastes.
I thought it was silly not to give it a try!

Coconut oil is healing and will help the remineralisation of tooth enamel.  It is also said to be antibacterial and will reduce the number of bacteria that causes tooth decay.
Bicarbonate of soda will gently scrub the tooth, cleaning and polishing the tooth surface. The bicarbonate of soda is quite salty so if it is too salty for you, just cut the quantity back some.
Peppermint oil leaves pleasant fresh breath and is reminiscent of regular tube toothpaste.  Try other essential oils for different flavours if you like.
The xylitol has many positive health benefits.  It is a natural sweetener with none of the scary health effects of artificial sweeteners.  Xylitol actively reduces tooth decay, with regular use as the sugar is in a non fermentable form.  It is even said that xyltiol promotes remineralisation of tooth enamel.


Homemade Peppermint Toothpaste
¼c coconut oil
2Tb bicarbonate of soda
10 drops peppermint essential oil (or to taste)
1Tb xylitol (or to taste)

Mash all ingredients together.
Store in a lidded jar.
Use as for conventional toothpaste.


Do you make your own toothpaste?  What special ingredients do you include?


Monday, May 27, 2013

pallet wood wall art


Today I'd like to share with you a project I completed recently, with my new favorite material, pallet wood.

Through Pinterest I found a heap of designs for furniture made using reclaimed timber and pallet wood.  I just love the junky chic of well worn timber.  So I bought myself a reciprocating saw, loaded up a trailer full of free pallets and got to experimenting.  If you don't yet own a power tool, I so recommend it.  Heaps of fun and so easy to create something great.

This project cost me nothing in materials.  I used free pallets and leftover screws, nails and paint from our ongoing house renovation.
I didn't take any progress photos, sorry!  But the instructions will be really simple.  Promise!

1. Break down a pallet.  Cut through the nails with a reciprocating saw or pry the timber apart with a crow bar and hammer.  Remove all protruding nails.
2. Choose a few pieces of timber which look good to you.  Lightly sand and arrange.
3. Flip timber over.  Nail two bracing pieces across the back to join all pieces together.
4. With a large dry brush, lightly paint the front.  Make it messy.  I used leftover house paint.
5. When dry, sand painted areas and all over front.
6.  Make a stencil with stiff cardboard.  I hand wrote the word love and cut it with a Stanley knife.
7.  Paint your word on the front using the stencil.  I used poster paint.
8.  Screw some eyelets into the back for hanging.
9.  Find a great place to hang your masterpiece.
10.  Wait for the compliments.

Hopefully the compliments you get are better than mine.  My 6 year old asked me why we had a lump of wood hanging on our wall.  And I have still to convince my husband.  Oh well!!  I like it and I hope you do too!!

Have fun creating!


Friday, May 18, 2012

diy laundry soap powder


I have been making my diy laundry soap liquid for a while now and am really happy with most of the process.  It is really easy, it is cheap to make and our clothes come out clean and smelling good. 

The down side for me is the space the product takes up.  Seven litres of laundry detergent is a lot of detergent to keep sitting in my laundry sink!!  I store the liquid in a recycled food grade bucket with lid and this sits in my laundry sink.  At the moment, I have no bench space in my laundry and no lockable cupboards, but I do have a big double sink.  So the bucket sits in the sink closest to the washing machine and all the other associated washing stuff either sits in the sink too or on the window sill.

My functional, not beautiful, current laundry set up.

But when Jane from the healthy beehive recently posted her recipe for powdered laundry soap I thought I should give that a go too.

I love it!

I have not made the liquid since I started on the laundry soap powder.  The best thing about it is that it takes up heaps less space.  The washing qualities are the same and it dissolves well.

This is my interpretation of...


Powdered Laundry Soap

2 grated bars laundry soap (Sard Wonder Soap)
1 cup baking soda
1 cup borax
1 cup washing soda (lectric soda)
1 cup powdered stain booster (NapiSan)

Mix this in a large bowl and store in a sealed container.
Use 1/4cup per wash.


Let me know how you find this mix. 
Do you tweak your laundry powder a different way?


Sharing at


Thursday, April 26, 2012

a few before(s)

I have found myself recently thrifting big items at the op shops, tip shop, garage sales and gumtree.  These are things that I have been on the look out for, for some time and I have just come upon them seemingly all at once. 
But the down side of this thrifters 'high', means I have a few pieces of furniture to repair, modify and put into use.  I do love fixing stuff up, it is just hard to find the time to do it and so they sit forlorn in the garage, mocking me when ever I look at them. 

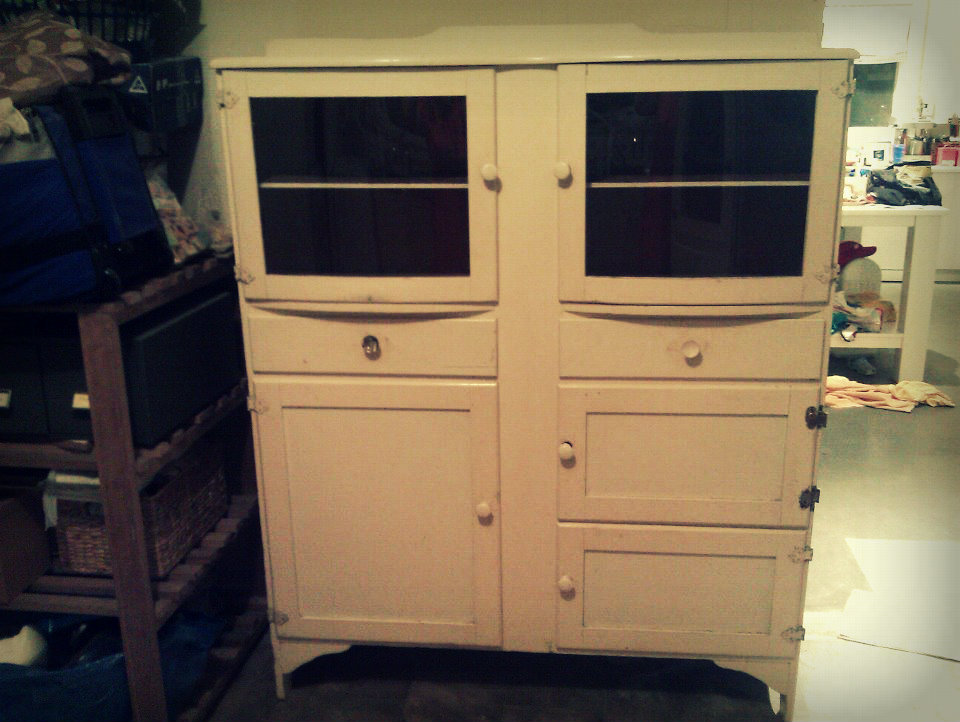
So to motivate myself, here are my newest purchases and what I intend to do to them.

1920 style solid timber single kitchen cupboard
Needs some adhesive plastic book covering removed from the shelves, glass or wire mesh or fabric added in the top door panel and a good clean down but really was in very good shape.  Will be housed in the new laundry/mud/craft room.


1940 style solid timber double kitchen cupboard
Needs several minor issues fixed, 2 hinges replaced, timber filled, door knobs changed, draw dividers added and a good clean down.
It has perspex in the top door panels and this will stay in for the foreseeable future.   Later I will make lead light windows in a traditional sunburst design (my favorite!!),
instructed by my family's resident glass guru, my mum!
This beauty may live in the kitchen / dining room with storage for my preserving things.


vintage hall table
This beauty was rescued from the tip shop.  It looks like it has had a hard life. 
The top is split in two and is not attached securely to the legs, but the legs are solid and even! 
I will remove the top, rejoin the timber, maybe a very light sand down and rejoin to the legs.
I love the multi paint colours in this piece and the turned legs. 
It will be a side table in my (not yet built) garden summer house.


I just love furniture with age and wear showing.  It fits perfectly with my eclectic, vintage style. 

(This sounds much more fancy than it is in reality.  Its just a heap of furniture that I love, put together, sharing the same space.  I think it works together because I love each piece for what it is alone!)

I also love that buying this furniture is thrifty and one of a kind.

Well, I must make a start on one of these projects...
...maybe tomorrow!


Do you thrift shop furniture?  What are your latest bargain purchases?


Sharing at

Thursday, April 19, 2012

outdoor adventure kids birthday party


I was really pleased with how this party eventuated.  The kids had heaps of fun running about outside and exploring in the bushland and it was low stress and on budget for me. 
Win - win!!

Most of the details of this party you will find here.  And the rest is as follows.

Menu
This was a good amount of food to provide for our guests (10 kids + 10 adults).  We did have some food leftover, but not too much.  It was good not serving a hot food and no-one missed it at all.  The food was laid out (covered) on the serving table at the beginning of the party and uncovered when it was time to eat.

sweet - mini wafer biscuits (2 pks), mint slice biscuits (2 pks), sweet & salty popcorn (6lt), 3kg imperial mandarines, birthday cake (based choc ripple cake)
savoury - plain corn chips (2 pks), pumpkin dip, hommus, water cracker biscuits, camembert cheese (3 rounds), egg & lettuce sandwich triangles (15 eggs mashed with mayo, 1 iceburg lettuce, 2 loaves bread)
drinks - hot drinks for adults, 300ml bottled water (24 pk), raspberry syrup

All the extras...
I made a tree birthday cake.


We hung fabric bunting around the picnic area...


along with my paper bag happy birthday bunting.


I thought it all came together really well, the kids had a great time
and the birthday boy was delighted with it all.


A good day was had by all!!


Sharing at


{almost no sew} fabric bunting - a tutorial


****************************


5.  Sew the fabric to the tape in one long zig-zag line.

Hang the bunting up and have a party!!

See, it is almost no sew!  You could have it completed within the hour. 
{ps. You could make it even quicker if you staple the fabric to the twill tape!  Nobody will know!}

Got to love a fast & frugal craft project!!

****************************


How do you decorate for a kids party?


Sharing at

Saturday, April 14, 2012

happy birthday banner - a free printable

Today's post is a free printable banner suitable for an eco/crunchy/frugal kids birthday party. 

Master (almost) Six's birthday party is coming up soon and I am in the midst of planning for the party.  This will be one of the decorations for our picnic area where we will be serving afternoon tea and cake.  I like it because it is re-useable and easy to make at home.

Happy Birthday Banner by smallthingsbynona

I printed the banner onto brown paper lunch bags and stapled the bags onto twine.  Leave yourself enough twine ends to tie the banner to something.


What do you use to decorate your kid's birthday parties?


Sharing at

Thursday, April 12, 2012

birthday party planning - how i do it


In an effort to make more sustainable choices for my kids birthday parties, I have made some changes to how I plan and how we celebrate.  As priorities, our parties must be cost effective, as we have 4 parties to throw each year, and simple to organise, because I like to have fun at the party too!

I break my party planning down into simple to plan tasks.  I made a simple (I do stress simple, I'm no graphic designer, but it does the job!!) birthday party planner that I use for every party.  I print it out, fill it in and keep checking back to it often.  It makes the task of planning that bit easier. 
Take a look and see if it can work for you too.


Theme
The first thing to decide is the theme.  From there all the other bits fall more easily into place. 
I just love the inspiration of this party, and am doing my own version.  We do not have a farm, but there is an arboretum (tree park) close by.  So we will be having Master almost Six's party there with an outdoor adventure theme.  He and his friends will have heaps of room to play games, there are sheltered BBQ areas with power and seating and an easy walking track.

Numbers
To keep the chaos to a minimum, we allow the birthday child to invite only as many friends as the new age.  The birthday boy will be turning six, so six friends will be invited.  This is in addition to the family members who also attend our family do's. 

The reasoning behind this numbers game is that smaller numbers are easier to supervise and entertain, the birthday child is not overwhelmed with gifts (often items I would otherwise not have in our home) and less food is required so I do not have to spend so much time and money preparing refreshments.
And that is the way my parents did it and I have memories of great birthday parties!!


Invitations
I use free printable invitations that I come across online and have set up a Pinterest board to keep them all organised until I need them.  This time around I used a download from WorldLabel.  We printed the birthday party info onto the cards and they worked really well.

If you have found any good free birthday invitation printables I would love to hear about them!!


Party Bags
I dislike the idea of plastic rubbish and more lollies coming home from birthday parties. So for this party I will be making simple fabric bags, which the kids will decorate with fabric markers.  The bags will hold the kids treasure hunt items and be the bag to take home some birthday biscuits as party favors.

Activities and Games
I usually allocate about one third of the party time to organised activities and games, about one third to free play and the remaining third covers eating, gift opening and cake cutting. 
This time around, our planned activities will be decorating the fabric bags, hiking an easy track around the park doing a nature based treasure hunt and party games, like musical chairs and pass the parcel.  *Edit - we never got to the traditional party games.  The kids were entertaining themselves quite happily and I didn't want to interupt!!


Decorations
I made a printable happy birthday banner and some {almost no sew} fabric bunting, that will look great hanging around the picnic area for our party.  They are both frugal and reusable items.  And will be simpler to set up and clean up than balloons and streamers.


What are your tips for a fun, easy and sustainable kids birthday party?


You are welcome to use my free printables for your personal use.
If you would like to share them, please link back to this page.
Thank you.


Sharing at
30 Handmade Days ~ Frugal Days, Sustainable Ways ~ Your Green Resource